This sample illustrates how to implement federated authentication using ACS and an active Directory Federation Services (AD FS) 2.0 identity provider with a WCF relying party web service. The sample includes a WCF service and a WCF client as command line applications. The WCF service requires that clients authentication using a SAML token from ACS, which is obtained via another SAML token acquired from an AD FS 2.0 identity provider. The web service client requests a SAML token from AD FS 2.0 using Windows Authentication, and then exchanges this token for the ACS token required to access the WCF service.
Prerequisites
To run this sample, you will need:
- To create an account at http://windows.azure.com and create an Access Control Service namespace.
- Visual Studio 2010
- Windows Server 2008
- AD FS 2.0 and its requirements
System Requirements For Development
- Visual Studio 2010
- .NET Framework 4.0 or .NET Framework 3.5 SP1 with KBs 976126 or 976127 applied
- Windows Identity Foundation SDK
Windows Azure Account Requirements
To use ACS, you must first obtain a Windows Azure subscription by browsing to the Windows Azure AppFabric Management Portal and signing up. Once you have a subscription, on the Windows Azure AppFabric Management Portal, browse to the Service Bus, Access Control, and Caching section and create an Access Control Service namespace.
Platform Compatibility
ACS is compatible with virtually any modern web platform, including .NET, PHP, Python, Java, and Ruby. ACS can be accessed from applications that run on almost any operating system or platform that can perform HTTPS operations.
Configuring the Sample
The ACS configuration required for this sample can be performing using either the ACS management portal, or the ACS management service. Select one of the two options below to go to the relevant section.
- Option 1: Configuring via the ACS Management Portal
- Option 2: Configuring via the ACS Management Service
Note that since I am using AD FS 2.0 as the federation server, AD FS 2.0 must be installed and running.
For more information about installing AD FS 2.0, see http://technet.microsoft.com/en-us/library/dd807086(WS.10).aspx
Configuring via the ACS Management Portal
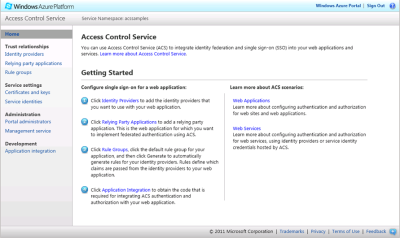
Step 1 : Open a browser and navigate to http://windows.azure.com and sign in. From there, navigate to the Service Bus, Access Control, and Caching section to configure your ACS service namespace. Once you have created a namespace, select it and click Manage > Access Control Service at the top of the page. This should launch the following page in a new window
Step 2: Next, add your AD FS 2.0 identity provider. To do this, you will need to have your WS-Federation metadata document, which is hosted in your AD FS 2.0 server at /FederationMetadata/2007-06/FederationMetadata.xml. For example, if your AD FS 2.0 server is installed on a computer with the name abc.com, then the metadata URL will be:
https://abc.com/FederationMetadata/2007-06/FederationMetadata.xm
if the computer running AD FS 2.0 is accessible from internet and not placed behind a firewall, then you can use this URL directly. Otherwise, you will need to save this document to your computer and upload it to ACS when adding your identity provider.
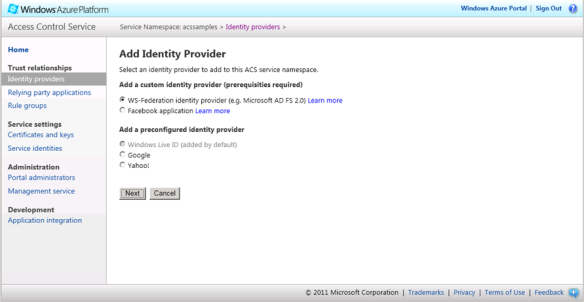
Step 3: Click Identity Provider in the left panel and then click Add.
Step 4 : Select WS-Federation identity provider and click Next. Depending on the Metadata document’s location, complete the form either entering the URL or using the saved file.
Step 5 : Next, register your application with ACS by creating a relying party application. Click the Relying Party Applications link on the main page, then click Add and enter the following information in the subsequent form.
- In the Name field, enter some name which you want for example “Federation Sample “
- In the Realm field, enter your app url ex: http://localhost:7200/Service/Default.aspx
- In the Token format field, select SAML 2.0
- In the Token encryption policy field, select “Require Encryption”
- In the Identity Providers field, check only the AD FS 2.0 identity provider added in the previous step
- For Token signing, select “Use a dedicated certificate”. For the certificate file, browse for the ACS2SigningCertificate.pfx file in the Certificates folder of this sample. Enter a password of “password”.
- For the Token encryption certificate, browse for the WcfServiceCertificate.cer file in the Certificates folder of this sample and save the settings.
Step 6 When complete, click the Save button and then navigate back to the main page.
Step 7 : With your relying party registered, it is now time to create the rules that determine the claims that ACS will issue to your application. To do this, navigate to the main portal page and select Rule Groups. From there, select the Default Rule Group for Federation Sample RP. Click Generate and then select AD FS 2.0 in the subsequent form. Complete the form by clicking on the Generate button. This will create passthrough rules fo AD FS 2.0 based on the claim types present in the WS-Federation metadata.
Step 8: Now it is time to add the decryption certificate. This certificate is needed for ACS to decrypt incoming tokens from the AD FS 2.0 identity provider. To do this, click Certificates and keys in the left panel, and click the Add link for Token Decryption.
Step 9: In the Certificate field of the subsequent form, browse to Certificates folder of this sample and pick ACS2DecryptionCert.pfx. The password for this certificate is “password”.
Step 10: Complete the form by clicking Save.


artilce is good amit..